在Liferay中集成ueditor编辑器
本文章基于Liferay6.2。
按照此文说明,可以完成集成,如果是想要现成的,请到淘宝购买,不免费。
淘宝链接:https://item.taobao.com/item.htm?id=533006976450
Liferay中自带的富文本编辑器为ckeditor,此编辑器基本功能还好,但是文件上传的体验实在是太差,而且界面也不是很美观,国内百度前端团队提供的Ueditor,应该是国内目前最好用了编辑器了。下文说明,如何在Liferay中集成此编辑器。
在Liferay集成Ueditor一般有两种场景。
1、在自己写的Portlet插件中使用Ueditor;
2、替换Liferay的内容管理,网页内容发布里面编辑器为ueditor;
其实我们所说的集成ueditor,主要是来处理文件和图片的上传,如果不涉及文件或图处上传,针对场景1我们在自己开发的Portlet里面将ueditor相关的内容引入,然后在页面中引入相应的js就和普通的web一样使用了。场景2则有点麻烦。
本文章所采用的方法为开发一个Hook插件,完成后的效果为:
1、针对上面的场景1,我们使用下面的标签即引入Ueditor。
<liferay-ui:input-editor name="detail" editorImpl="editor.wysiwyg.ueditor" >
2、针对上面的场景2,我们在portal-setup-wizard.properties里面建立下面的配置,重启后,内置的网页内容管理的编辑顺即使用Ueditor,图片上传等功能正常。
editor.wysiwyg.portal-web.docroot.html.portlet.journal.configuration.jsp=ueditor
editor.wysiwyg.portal-web.docroot.html.portlet.journal.edit_article_content.jsp=ueditor
第一步:建立hook插件工程
在Liferay的IDE中,我们建立一个Hook的插件工程。
1、从网上下载ueditor的UTF-8的JSP版本。http://ueditor.baidu.com/website/download.html
2、在hook工程下面WEB-INF目录下面找到liferay-hook.xml文件,打开在里面的<hook></hook>之前输入<custom-jsp-dir>/custom_jsps</custom-jsp-dir>。
3、在docroot目录下面建立,custom_jsps目录(和2里面配置的路径保持一致),再在此目录下面依次建立html/js/editor目录。
4、将从网上下载的ueditor解压,然后重命为ueditor,复制到上面的editor目录下面。并建立一个uedtor.jsp文件。目录结构如下:

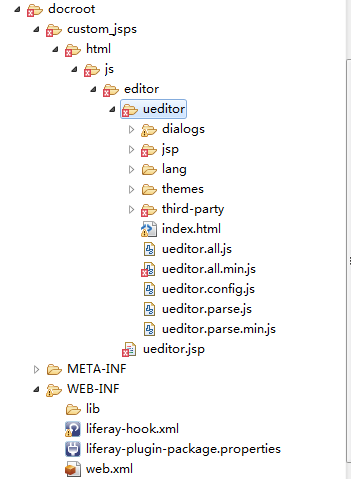
5、删除ueditor下面JSP目录里面的lib目录。这里放的是相关的jar包,做文件上传手,我们后面处理。
第二步:修改ueditor.jsp文件。
ueditor.jsp文件是来负责<liferay-ui:input-editor>标签的显示的,也就是说当我们在页面中使用此标签的时候调用的是ueditor.jsp文件。此文件的写法我们可以参考Liferay默认提供的编辑器的写法,可以在源码的portal-web/docroot/html/js/editor下面找到,里面的bbcode.jsp、ckeditor.jsp、fckeditor.jsp、tinymce.jsp等等,都是类似的文件,可以打开参考。
1、我们可以重点参考ckeditor.jsp和tinymce.jsp。将上面的java小代码部分复制到ueditor.jsp里面来。重点的部分为引入ueditor和设置相关的JS调用。
2、ueditor的代码引入:
最前面的<%%>里面的java小代码就不再另述了。可以直接从ckeditor.jsp或者tinymce.jsp里面复制。
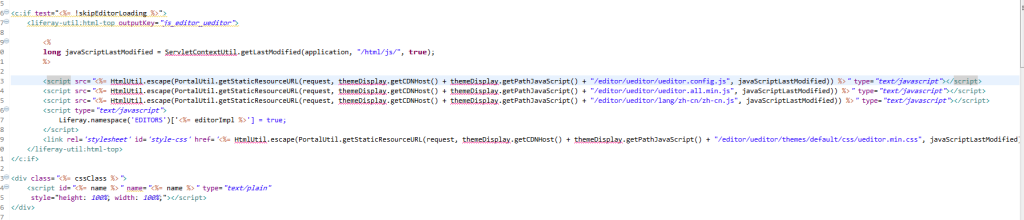
<c:if test="<%= !skipEditorLoading %>">
 <liferay-util:html-top outputKey="js_editor_ueditor">

<%
 long javaScriptLastModified = ServletContextUtil.getLastModified(application, "/html/js/", true);
 %>

<script src="<%= HtmlUtil.escape(PortalUtil.getStaticResourceURL(request,
themeDisplay.getCDNHost() + themeDisplay.getPathJavaScript() + "/editor/ueditor/ueditor.config.js",
javaScriptLastModified)) %>" type="text/javascript"></script>
 <script src="<%= HtmlUtil.escape(PortalUtil.getStaticResourceURL(request, themeDisplay.getCDNHost()
+ themeDisplay.getPathJavaScript() + "/editor/ueditor/ueditor.all.min.js", javaScriptLastModified)) %>"
type="text/javascript"></script>
 <script src="<%= HtmlUtil.escape(PortalUtil.getStaticResourceURL(request, themeDisplay.getCDNHost()
+ themeDisplay.getPathJavaScript() + "/editor/ueditor/lang/zh-cn/zh-cn.js", javaScriptLastModified)) %>"
 type="text/javascript"></script>
 <script type="text/javascript">
 Liferay.namespace('EDITORS')['<%= editorImpl %>'] = true;
 </script>
 <link rel='stylesheet' id='style-css' href='<%= HtmlUtil.escape(
PortalUtil.getStaticResourceURL(request, themeDisplay.getCDNHost() + themeDisplay.getPathJavaScript()
+ "/editor/ueditor/themes/default/css/ueditor.min.css", javaScriptLastModified)) %>' type='text/css'/>
 </liferay-util:html-top>
</c:if>
<div class="<%= cssClass %>">
 <script id="<%= name %>" name="<%= name %>" type="text/plain"
 style="height: 100%; width: 100%;"></script>
</div>
3、上面算是引入ueditor相关的JS和CSS,下面的<script>里面的是我们存放内容的部分。
4、ueditor的初始化和相关的JS代码的调用。下面是我们做的uedtior的初始化,serverparam是上传图片是所需要的两个额外参数,groupid和userId。
 var ue = UE.getEditor('<%= name %>');
 ue.ready(function() {
 ue.execCommand('serverparam', {
 'groupId': '<%=doAsGroupId%>',
 'folderId':'0',
 'userId':'<%=userId%>'
 });
 ue.setContent(window['<%= HtmlUtil.escapeJS(namespace + initMethod) %>']());
 });
5、如果只是我们针对最开始说的场景1,那现在就可以了,但是如果要能够在场景2里面使用,liferay默认里面有一些编辑器初始化和获取内容的代码,需要我们照写。代码如下,这些代码为方便集成liferay内部如网页内容发布,博客等的JS而写。
window['<%= name %>'] = {
 onChangeCallbackCounter: 0,

destroy: function() {
 ue.destroy();
 window['<%= name %>'] = null;
 },

focus: function() {
 UE.getEditor('<%= name %>').focus();
 },

fileBrowserCallback: function(field_name, url, type) {
 },

getHTML: function() {
 var data;

if (!window['<%= name %>'].instanceReady && window['<%= HtmlUtil.escape(namespace + initMethod) %>']) {
 data = <%= HtmlUtil.escape(namespace + initMethod) %>();
 }
 else {
 data = ue.getContent();
 }

return data;
 },

init: function(value) {
 if (typeof value != 'string') {
 value = '';
 }

window['<%= name %>'].setHTML(value);
 },

initEditor: function() {
 <c:if test="<%= Validator.isNotNull(initMethod) %>">
 <%= name %>.setHTML(window['<%= HtmlUtil.escapeJS(namespace + initMethod) %>']());

<c:if test="<%= resizable && BrowserSnifferUtil.isIe(request) %>">
 new A.Resize(
 {
 handles: 'br',
 node: '#<%= name %>_container',
 wrap: true
 }
 );
 </c:if>
 </c:if>

window['<%= name %>'].instanceReady = true;
 },


 initInstanceCallback: function() {
 window['<%= name %>'].instanceReady = true;
 },

instanceReady: false,

<%
 if (Validator.isNotNull(onChangeMethod)) {
 %>

onChangeCallback: function() {


 var onChangeCallbackCounter = window['<%= name %>'].onChangeCallbackCounter;

if (onChangeCallbackCounter > 0) {

<%= HtmlUtil.escapeJS(onChangeMethod) %>(window['<%= name %>'].getHTML());

}

onChangeCallbackCounter++;
 },

<%
 }
 %>


 setHTML: function(value) {
 ue.ready(function() {
 ue.setContent(value);
 });

 }
 };
6、ueditor.jsp的完整代码点击这里进行下载。ueditor。
第三步:文件上传处理。
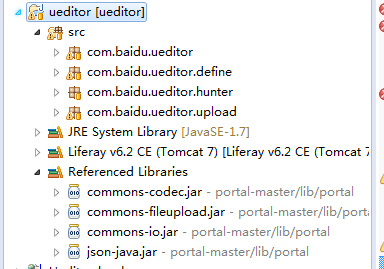
1、下载ueditor的源码包,在里面找到jsp目录下面有src,相关的源码。
2、将此源码导入到eclipse工程里面为一个普通的java工程。
3、修改build path里面的jar包依赖,为liferay本身有的包commons-codec.jar,commons-fileupload.jar,commons-io.jar,json-java.jar。
4、此时src里面的大部分错误已经消失了,但是在configmanager里面,由于json库不太一样有一些错误,我们进行修复调整即可。
5、找到com.baidu.uedtor.upload下面的BinaryUploader类,这是上传文件处理类。里面默认有这么一行代码,在80行左右。
State storageState = StorageManager.saveFileByInputStream(is,physicalPath, maxSize);
将这里代码替换为我们自己写的,如下:
//Liferay file upload
 long groupId = ParamUtil.getLong(request, "groupId");
 long folderId = ParamUtil.getLong(request, "folderId",0);
 long userId = ParamUtil.getLong(request, "userId");

 State storageState = StorageManager.saveFileToLiferay(is, fileStream.getName(),userId,groupId,folderId);
 //State storageState = StorageManager.saveFileByInputStream(is,physicalPath, maxSize);
 is.close();

if (storageState.isSuccess()) {
// storageState.putInfo("url", PathFormat.format(savePath));
 storageState.putInfo("type", suffix);
 storageState.putInfo("original", originFileName + suffix);
 }
其中的StorageManager.saveFileToLiferay方法为我们在StorageManager里面自己定义的,代码如下:
public static State saveFileToLiferay(InputStream is,String fileName,long userId,long repositoryId,long folderId){
 State state = null;
 ServiceContext serviceContext = new ServiceContext();

serviceContext.setAddGroupPermissions(true);
 serviceContext.setAddGuestPermissions(true);

 try {
 String description = StringPool.BLANK;
 String changeLog = StringPool.BLANK;

 byte[] bytes = FileUtil.getBytes(is);

 String mimeType = MimeTypesUtil.getContentType(fileName);

 //因为liferay默认情况下不能上传同名的文件,为了处理这个问题,添加一个时间戳
 String sourceFileName = System.currentTimeMillis() + "-" + fileName;

 FileEntry fileEntry = DLAppLocalServiceUtil.addFileEntry(userId, repositoryId, folderId,
fileName, mimeType, sourceFileName, description, changeLog, bytes, serviceContext);

 String url = "/documents/" + fileEntry.getRepositoryId() + "/"+ fileEntry.getUuid();

 state = new BaseState(true);
 state.putInfo( "size", fileEntry.getSize());
 state.putInfo( "title", fileName);
 state.putInfo("url", url);

 return state;
 } catch (PortalException e) {
 e.printStackTrace();
 } catch (SystemException e) {
 e.printStackTrace();
 } catch (IOException e) {
 e.printStackTrace();
 }

 return new BaseState(false, AppInfo.IO_ERROR);
 }
6、现在上传的代码处理完成,在此java工程上点击右键,导出成jar包。复制到portal的web-inf/lib目录下面即可。
第四步:代码的使用
首先:部署上面的hook工程,和将ueditor.jar包复制到了portal/web-inf/lib目录下面。
如果是在自己的Portlet插件中使用代码如下,如果在portal-setup-wizard.properties里面加入此行配置editor.wysiwyg.ueditor=ueditor
<liferay-ui:input-editor name="detail" editorImpl="editor.wysiwyg.ueditor"/>
 如果是想向编辑器里面设置内容:
<aui:script use="aui-base">
	window['<portlet:namespace />detail'].init('${question.detail}');
</aui:script>
如果是要替换网页内容管理,则在portal-setup-wizard.properties里面加上如下配置,重启之后即生效。
editor.wysiwyg.portal-web.docroot.html.portlet.journal.configuration.jsp=ueditor
editor.wysiwyg.portal-web.docroot.html.portlet.journal.edit_article_content.jsp=ueditor
按照此文说明,可以完成集成,如果是想要现成的,请到淘宝购买,不免费。